
This stitch in hardanger can only be done after you have cut away the fabric. You should have fabric left open with only one direction of thread - this is the fabric that needs wrapping to prevent it from fraying away.
The chart diagrams usually show wrapping as small lines close together like this:

After attaching your thread (and it's usually a size smaller than your kloster block thread) you should bring your needle up through the centre of the fabric. The stitch is worked in a figure of eight;
up the centre, down the outside, up the centre again, down the opposite outside.
These photos show each needle movement, (I have no idea why the second photo is on its side, sorry).


There is no specific amount of wrapping but you should make sure the stitches sit close together and that you do pull quite tightly. This is the completed square.

If you are practicing on your square of large fabric I suggest you use the large size thread, but remember to use a smaller size on your bookmarks.
Happy stitching

 Repeat this for all the areas needed.
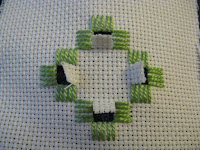 Pull all the small threads out that run across the three sides of the small squares you have cut; then pullthe longer threads which will run right across your work and will reveal any onner blank squares. You may finds it easier to do this with tweezers.
 Using a needle release the fabric thread right back to your stitching. Cut down the centre of the remains fabric threads and pull them all back to the kloster blocks. This photo shows all the threads pulled back.


